A considerable amount of engineering goes into making plastic surfaces look and feel good. To a large degree, surface texture is a user’s first impression of product quality, whether it’s on an automotive dashboard, smart phone or remote control.
Plastic textures are often specified by choosing a sample reference number from one of several mold texture systems (Figure 1). This approach is sufficient for surfaces which are primarily aesthetic. However, for precision applications, such as medical devices and lighting, it may not be sufficient to control how the surface performs.
Measurement-based approaches provide a more exact assessment of surface texture. Surface texture measurement provides an objective record (and in the case of 3D measurement, a “digital twin”) for historical reference. This data can also feed design models and provide feedback to the processes that create the surfaces, all of which is only possible with objective, measured data.
What Texture Cards Can (and Cannot) Provide
Referencing a texture card is a fast and straightforward way to describe molded plastic textures. Figure 1 includes textures based on the VDI 3400 standard, as established by the Verein Deutscher Ingenieure (VDI), the Society of German Engineers. Other common systems include Society of the Plastics Industry, now the Plastics Industry Association (SPI) and Mold-Tech.
A molded plastic texture is typically “controlled” by visual assessment. An inspector may look for degradation over time as the mold wears. Most often, however, quality checks tend to focus on defects which interrupt the randomness of the texture, such as drag lines or sink/shrink marks.
As tooling wears over time, the depth and sharpness of an etched finish will inevitably degrade. Manufacturers aiming for more consistent, higher end finishes may find it challenging to control surfaces by visual assessment alone — visually determining whether a mold is producing parts which are still sufficiently sharp or veiny or pebbled can be a highly subjective exercise.

FIG 2 — Finer textures become more difficult to distinguish by comparison methods. Source | Verein Deutscher Ingenieur, the Society of German Engineers.
The challenge is even greater for finer textures. Figure 2 shows three textures from Figure 1. Determining whether a molded surface is still sufficiently close to a VDI18 texture, or whether it has now drifted too far and is now closer to VDI15, is likely to be open to interpretation.
Without an objective way to assess surfaces, suppliers and customers can interpret texture quality quite differently, and those discrepancies may lead to rejected parts or lengthy quality holds as both camps stand by their interpretations.
Precision Surfaces Require More Control
Surfaces that are both functional and aesthetic present an even greater challenge. Molded plastics for automotive lighting present such a challenge. These surfaces must randomly scatter and/or reflect light, while also meeting the requirements of Class A automotive surfaces, which are aesthetically flawless. A Mold-Tech or SPI texture number alone cannot describe these surfaces. In these cases, optical modeling of the surface topography can help optimize the surface design and better define the surface requirements for performance.
The performance of medical devices, such as those in contact with fluids, may also be impacted by various aspects of texture, including directionality (lay), spacing between micropeaks, roundness or sharpness of those peaks, presence of porosity and others.
Quantitative Methods
In recent years, many plastics manufacturers have shifted to describing surface texture using numerical values rather than subjective assessment. This trend echoes a similar shift which occurred in metals machining over the last several decades.

FIG 3 — Measuring surface texture using a handheld texture measurement system from GelSight (left) and a 3D optical profiler from Digital Metrology Solutions (right).
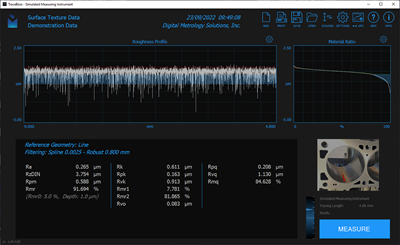
Surface texture may be measured using various instruments, ranging from handheld gages to higher end equipment such as 3D optical measurement systems (Figure 3). Using this measurement data, a number of surface texture parameters can be calculated (Figure 4), forming an objective basis for process and quality control.

FIG 4 — A measurement of a remote control’s surface texture, shown in software texture software. A range of surface texture parameters, including average roughness (Sa), is shown at right. Source: Digital Metrology Solutions.
Tracking Changes
The most commonly specified surface texture parameter is average roughness (Ra or Sa), which can indicate whether a surface or process has undergone a change. Ra reports the average height of all points along a 2D trace across a surface, whereas Sa reports the average height of all points across an area. The parameter provides traceable data that can show trends over time, which is a crucial first step in improving quality control.

FIG 5 — These two surfaces are clearly different, yet to a parameter such as average roughness they are virtually identical. Source | Digital Metrology Solutions.
Average roughness, however, may not tell us everything we need to know to describe a surface. For example, Ra (Sa) cannot distinguish peaks from valleys nor can it describe the spacing between texture features, directionality and more. Figure 5 shows two 3D surface texture measurements. Our eyes can easily tell these surfaces are very different; yet, in terms of average roughness, they are essentially identical. Other parameters that are sensitive to aspects of texture often prove more useful for establishing part quality.
Texture and Defects
Numerical data provides an objective basis for surface texture quality. Establishing an acceptable average depth for an etched texture, for example, removes the subjectivity of visual inspection. It also enables a manufacturer to implement guidelines, based on actual wear data, for how long a mold can be used before rework. Similarly, establishing acceptable dimensions for sink marks or drag lines removes any subjectivity that could lead to costly disputes with suppliers or customers.

FIG 6 — Surface segmentation analysis in surface texture software can help describe individual shapes within complex textures, such as those shown in Figure 5. Source | Digital Metrology Solutions.
Functional Surfaces
Controlling functional surfaces may require more than a single parameter, such as Ra. A combination of parameters may be needed to control the important aspects of a particular texture. For example, a parameter such as Summit Curvature may help describe the sharpness of the peaks in the texture or surface segmentation can describe the shapes of individual features in complex textures (Figure 6). Analysis based on thresholds can describe porosity, which may be important for fluid or lubricant retention (Figure 7).

FIG 7 — Advanced techniques, like this pit/porosity analysis, can help control aspects of functional surfaces. Source | Digital Metrology Solutions.
Advanced Manufacturing Processes
Advanced processes like laser texturing have specific quality requirements. Laser texturing can enhance adhesion and conduction while also creating sophisticated optical functions, as well as improving appearance and texture. Changes in process parameters, such as material removal rate and temperature, may impact these functional aspects. 3D texture analysis can help establish parameters to track the aspects of the texture that contribute to a quality finish.
Optical modeling of surface topography can optimize the surface design and better define the surface requirements for optimal performance.
Analysis Software
In recent years, several software packages have been developed to help designers understand the aspects of texture that are relevant to a particular surface. Such software enables surface texture analysis to be visual as well as numerical. Both of these functions are essential for helping designers understand how a surface must be controlled and how best to do so in a production environment.
The images in Figures 4–7 show surfaces in surface texture software that enables a designer to spin, zoom and accentuate the surface texture. It also helps the user see how changes in processes and materials affect various parameters.
Also, advanced analysis may be used to develop an inspection recipe. Once that recipe has been established, simpler production measurements may be enough to track the parameter values and control the surfaces.
Summary
As manufacturers demand tighter control over surface textures, subjective inspection may prove inadequate. Transitioning from visual to numerical descriptions and controls offers a more precise method for defining surface quality. Thankfully, measurement and analysis tools are increasingly available to facilitate this transition.
The authors would like to acknowledge Drew Haywood for his invaluable input on this article.
Related Content
Line Width vs. Depth Ratio in Laser Engraving
A laser does not produce 90-degree sidewalls. It requires a certain amount of draft in order to produce the required pattern.
Read MoreHow to Overcome Complex Mold Texturing Problems
Key benefits when considering laser technology for mold texturing and repair.
Read MoreBest Practices for Engraving Cores and Cavities
Consider depth, font style, artwork size, polarity and location when engraving.
Read More2024 Moldmaking Insights: A Year in Review Part 1
A look back at the top moldmaking trends of 2024, as revealed through MMT's analytics. This review highlights the most popular technical articles, case studies, tips and best practices that captured the industry's attention over the past year.
Read MoreRead Next
How to Overcome Complex Mold Texturing Problems
Key benefits when considering laser technology for mold texturing and repair.
Read MoreWhat Does Surface Roughness Mean in Moldmaking?
To improve mold performance, reduce wear and produce high-quality molded parts, mold builders must understand surface texture and how to properly measure, analyze and control it.
Read MoreHow To Master Textured Molds With Design and Quality Control
Collaboration between design, materials and manufacturing teams ensures optimal development of durable, consistent custom textured molds.
Read More


